We're finishing our global summer vacation on the small island of Saint Lucia in the Caribbean Sea. Saint Lucia may be less than 650 m...

Read and Rise Global Explorers 2021 - Saint Lucia


We're finishing our global summer vacation on the small island of Saint Lucia in the Caribbean Sea. Saint Lucia may be less than 650 miles from Venezuela in South America, but all the Caribbean Islands are officially part of North America. The original inhabitants of this island were Caribs, but it was a French colony, then a British colony, and finally Saint Lucia achieved independence in 1979. Because of all the colonization, the culture and language of Saint Lucia are now an interesting blend of Carib, French, and English.

This post contains affiliate links. As an Amazon Associate, I may earn a small commission on qualifying purchases - at zero cost to you.

0 comments:

  Sensory bins can be super fun for kids and lead to prolonged independent play (which means a bit of relaxation time for moms and dads!). B...

Sensory Bin 101


Sensory bins can be super fun for kids and lead to prolonged independent play (which means a bit of relaxation time for moms and dads!). But they can also cause giant messes and lead to huge headaches. So I've put together a list of tips to help you have the former experience rather than the latter.
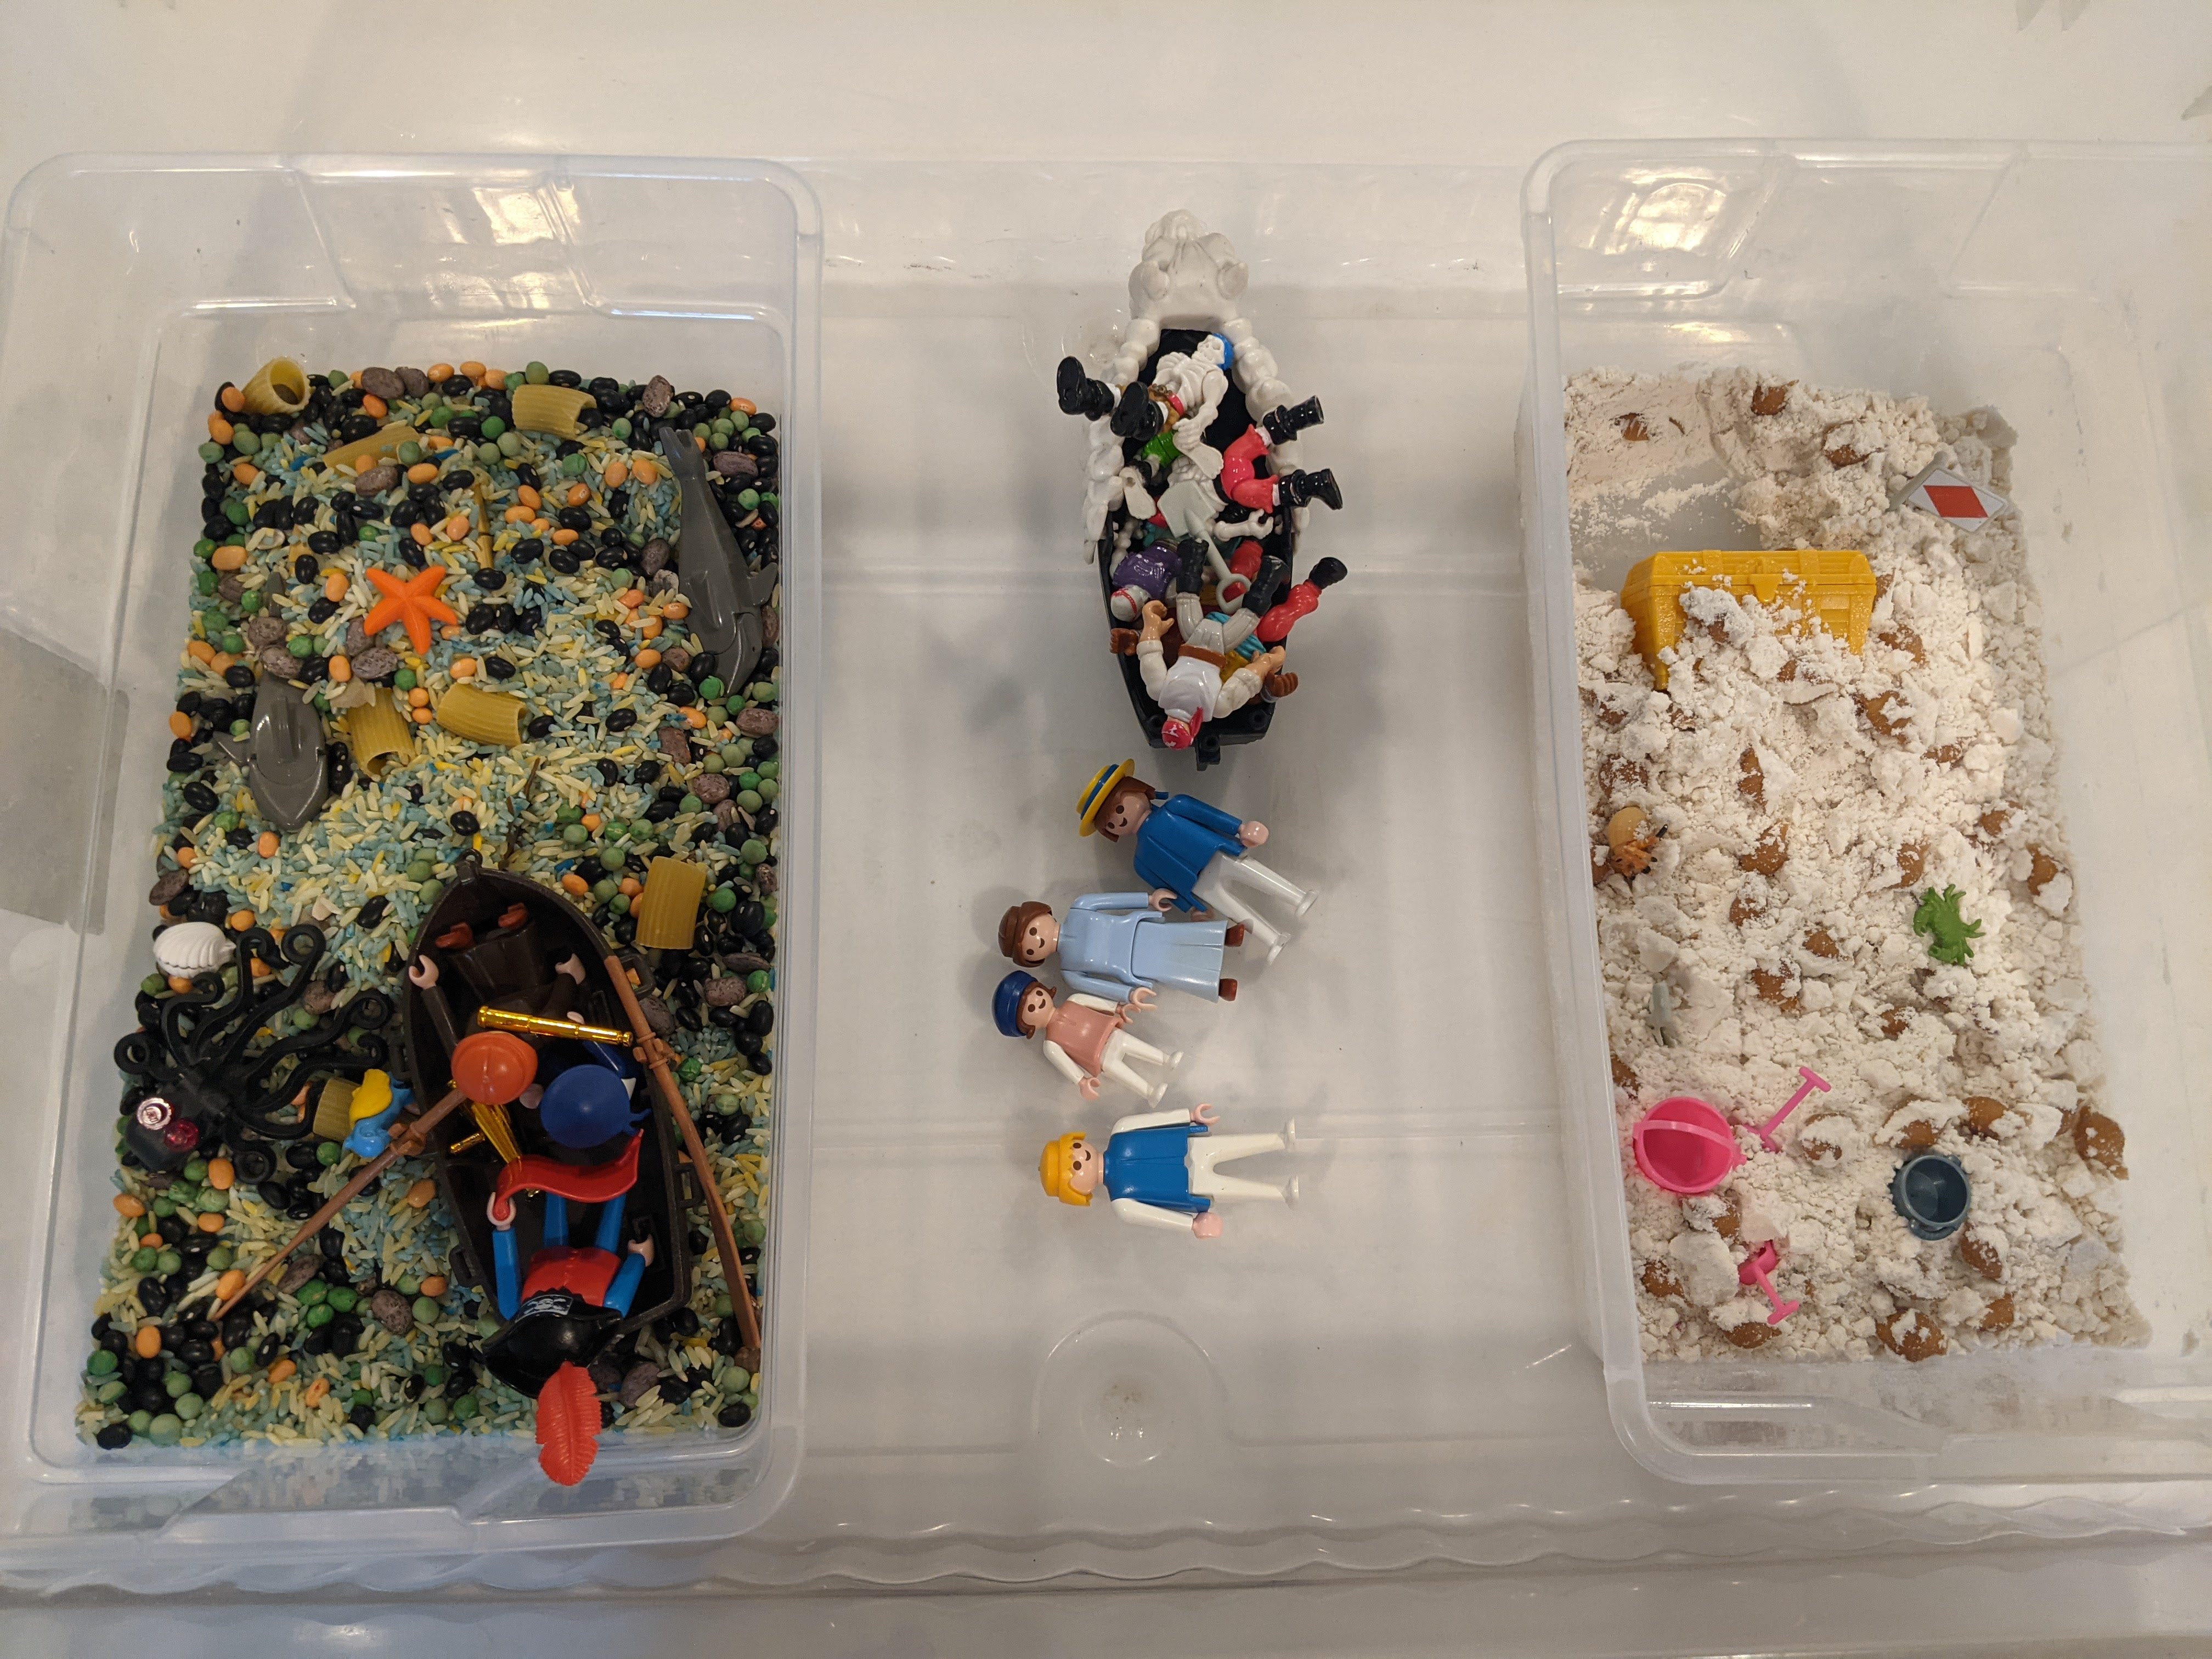
Tip 1:
Create some sensory bin rules. Just remember, the fewer rules, the better. Our one main rule is, try your best to keep the sensory materials in the bin. Accidental spills happen, but I've let them know from day 1 that pouring the filler onto the floor, table, anywhere outside the bin is not ok. Aside from that, different bins may have special rules. For example, when I set out the two bins pictured above, I told Squidgy that the toys can wander from bin to bin, but the rice and moon sand have to stay in their own bins.

Sometimes snack time becomes sensory play time for little ones...

Tip 2:
Plan to play with or right next to your child at least the first few times (it'll be longer if you're doing this with a toddler). This way you can model proper use of the bin and offer gentle reminders of the rules. Once they are able to play with few reminders, you can move away and just stay in the area. Definitely stay close by if they are young and still might put things in their mouths or noses. Regardless of how well they normally play or how old they are, you should always stay in the room for the most part, because sometimes play gets a little extra creative and you want to catch it before it gets out of control. 

A dish bin with water on a crate with some cups and bottles is a great sensory activity for little ones


Tip 3:
Babies who are able to sit up can use sensory bins! However, there are 2 important things to remember. Babies will not be capable of keeping the sensory materials inside the bin so expect mess. I often gave Lil C and Squidgy bowls while they were sitting in the high chair - the tray helped catch the spills and I could put towels under the chair to catch spills. The second thing to remember is: babies should not be given any materials that are unsafe to put in their mouths. My favorite sensory material for babies is plain old water! You can add a little food coloring to make it more visually appealing but they can scoop, stir, pour, and splash without you worrying about them ingesting something dangerous.


Tip 4:
I prefer to stick with non-toxic fillers such as water, beans, rice, oats, pasta, and flour so I don't worry if a little ends up in their mouths or they lick it or something. I also don't like using food for play and crafts (because there are people who don't have access to enough food...), so when I get food fillers for sensory bins, I keep them in large zip-top bags and try to reuse them as long as possible. 


Tip 5:
Smaller is better. I used to try to fill large bins with materials because it seemed more fun and somehow I thought a bigger bin would contain the mess better. But bigger bins just mean more filler. Last year I got a stack of plastic shoeboxes and I've been using those ever since. The smaller bins also allow me to make separate bins for Lil C and Squidgy so they don't argue or make two bins with different materials to use in the same play session (whatever you put in one bin WILL get mixed together). I can also put the smaller bins inside a larger under-bed storage bin so a lot of the accidental spills end up in there and the kids have a place to put their toys/tools when they don't want them in the bin. Finally, I can put the lid on the shoebox and put it in the closet to play with another day! 

Tip 6:
Have fun! Messes can always be cleaned up (and little ones can help wipe, sweep, or vacuum up spills!) but your kids will only be young once so let them play - and if you want get your hands in on the fun too!

0 comments:

  This week we're going to visit another island country full of volcanoes - Iceland! But since Iceland lies just at the edge of the Arct...

Read and Rise Global Explorers 2021 - Iceland


This week we're going to visit another island country full of volcanoes - Iceland! But since Iceland lies just at the edge of the Arctic Circle, the weather definitely won't be hot so don't forget to pack some sweaters and jackets! Like the Philippines, Iceland is more than just one island. There's one big island plus about 30 smaller islands. This includes Westman Islands which are considered to have the largest Atlantic puffin colony in the world and are featured in this week's story.

This post contains affiliate links. As an Amazon Associate, I may earn a small commission on qualifying purchases - at zero cost to you.

0 comments:

We're leaving Paraguay and continuing to travel west, this time across the Pacific Ocean! Our destination is a collection of over 7,500 ...

Read and Rise Global Explorers 2021 - The Philippines


We're leaving Paraguay and continuing to travel west, this time across the Pacific Ocean! Our destination is a collection of over 7,500 islands that make up the country of the Philippines! The Philippines lies just above the equator which means the temperature will be nice and warm today - a perfect day for the beach so don't forget to pack your swimsuit, towel, and sand toys - and a lot of sunblock! The sun is really strong near the equator and we definitely don't want to burn! 

This post contains affiliate links. As an Amazon Associate, I may earn a commission on qualifying purchases - at zero cost to you. 

0 comments:

  There are several different kinds of fossils , but the coolest might just be frozen fossils. Frozen fossils occur when an animal becomes e...

Paleontologist Pretend Play - Frozen Fossils


There are several different kinds of fossils, but the coolest might just be frozen fossils. Frozen fossils occur when an animal becomes entrapped somewhere that is freezing. This happened most often during the Ice Age - makes sense since it was freezing everywhere!

Recently million year old perfectly preserved plants frozen under nearly a mile of ice were discovered in Greenland. And several years ago, melting pack ice in Antarctica uncovered the frozen bodies of Adelie penguins from 800 years ago!

Your kids can uncover their own frozen fossils in this fun and chilly activity - perfect for the hot days of summer! It does require planning ahead, but it's very simple. Grab a large plastic container, fill it about 1/4 of the way up (our container is about the size of a 13x9" baking dish and I filled it with 6 cups of water). Toss in some dinosaurs, prehistoric creatures, shells, leaves, and anything else you think will be cool and put the container in the freezer for a couple of hours until it's frozen solid. At that point, add more water to fill the container halfway (I added 6 more cups) and put back in the freezer overnight. I freeze the water in two parts to make sure things are frozen in the middle of the ice and not just at the top and bottom.


When you're ready to excavate, flip the ice block out into a water table, underbed storage bin, or large foil tray. Your kids will need real tools (and close supervision!) to chip away at the ice block or you can give them warm water and salt so they can melt the ice. We decided to chip away at the ice with the kids' hammers and screwdrivers.


The ice was really stuck to this little guy so Lil C put him out in the sun to finish thawing.


They chipped and broke the ice until they freed all the creatures that were trapped in it. And then the resulting water and ice chunks inspired Squidgy to set up a slushie stand! 


I hope you enjoy all our paleontologist pretend play activities! In case you missed them, be sure to check out:


Additional sources: "What is a Frozen Fossil"

0 comments:

This is a super easy DIY dinosaur excavation that uses dried oobleck to encase the dinosaurs/fossils. For instructions on how to make the oo...

Paleontologist Pretend Play - Dinosaur Fossil Excavation


This is a super easy DIY dinosaur excavation that uses dried oobleck to encase the dinosaurs/fossils. For instructions on how to make the oobleck, check out my sensory play tar pit post. After you've made the oobleck, drop in some dinosaur toys, prehistoric creatures, bug toys, shells, rocks, and/or shark teeth. 

Let the mixture dry for a day or two - if you can put it out in the sun it will help it dry faster. Once it looks completely dry and starts cracking a bit, gently flip it out onto a tray. We got the tray in the above photo in the dollar spot at Target several years ago but you could always just use a large foil pan. Then arm your kids with a wooden hammer and chisel, a paintbrush, and a magnifying glass and let them excavate! (If you don't have a wooden hammer and chisel, random play dough tools can do the job as well. The materials cracks apart really easily so you don't really need anything specific.)


Uncovering treasures hidden inside!


Brushing off the fossil very carefully and showing Daddy what he uncovered!


I put the tent up over them to shade them from the sun and because it made it feel even more like a dig site!


After everything had been excavated, Lil C and Squidgy had a great time pulverizing the dried oobleck into dust and they played in it for hours! I had other activities ready to go but they spent the whole afternoon here, turning the oobleck powder into a small world for their creatures. And then Lil C had the idea to add water back to the powder, creating oobleck once more! Now the whole process has begun again!

0 comments:

  Do you love dinosaurs and other prehistoric creatures? Do you think it would be cool to discover the fossil of a never-before-seen creatur...

'Addison Rue is a Paleontologist' Book Review plus Dinosaur Tar Pit Sensory Play


Do you love dinosaurs and other prehistoric creatures? Do you think it would be cool to discover the fossil of a never-before-seen creature? Or maybe solve the mystery of why the dinosaurs all died? Have you ever dreamt of being a paleontologist? Well, Addison Rue has. 

This post contains affiliate links. As an Amazon Associate, I may earn a commission on qualifying purchases - at zero cost to you.


In "Addison Rue is a Paleontologist" by Samantha Cruz - the first book of the series, "Addison Rue and the Big Dreaming Book" - Addison Rue drifts off to sleep and finds herself right in the middle of a dig site! She realizes that she is a paleontologist and as so it is her job to learn about the past by studying fossils. As luck would have it, there are bones buried in her dig site! What does she uncover? You'll have to pick up this book to find out!

As homeschoolers, books like "Addison Rue is a Paleontologist" are fantastic for introducing unit study topics and building interest. After reading the story with my children (author Samantha Cruz kindly gifted us a digital copy for review), we were ready to become paleontologists. Or, almost ready...

Before we could excavate dinosaur fossils, we had to help them get trapped in tar pits where they could be preserved so as paleontologists we could uncover them millions of years later. To make our tar pits, we turned to our favorite non-Newtonian substance - oobleck.

Tar Pit Oobleck

Materials:
- cornstarch
- used coffee grounds
- water
- (optional) coffee

Directions:
1. Pour cornstarch into plastic bin. We used cold cuts containers and poured 2 cups of cornstarch into each one. (I HIGHLY recommend making a separate bin for each child, it makes things so much simpler.)


2. Add some used coffee grounds. We added about a 1/4 cup to each bin.


3. Add water (and coffee, if desired). I've often read a good ratio of cornstarch to water is 2:1 so we added 1 cup of liquid. However, our oobleck was too runny and we needed to add more cornstarch. Next time we do it I would start with a 1/2 cup of liquid and add a tablespoon at a time until we get the right consistency.


4. Stir it all together and start playing! We collected toy dinosaurs and prehistoric creatures as well as some bugs. As soon as you drop one onto the oobleck it slowly starts sinking in!


Since it's summer, this activity was definitely best done outside - much easier cleanup! I also put out a pot of water for rinsing hands/toys and a washcloth for each of them for drying. Lil C and Squidgy had tons of fun burying the animals in the "tar pits" and just messing around with the oobleck. We were definitely out there for a couple of hours at least.


When we were all done playing for the day, we dropped a bunch of animals into the oobleck (I also added a couple rocks, shells, and shark teeth) and put the bins aside to dry for a full day or two. Come back tomorrow to find out what we did next!

0 comments:

  After we had previewed "Emma Ren: Robot Engineer" by Jenny Lu back in April, I knew I had to figure out a way to bring battle b...

DIY Cardboard Battle Bots


After we had previewed "Emma Ren: Robot Engineer" by Jenny Lu back in April, I knew I had to figure out a way to bring battle bots into our home, but without spending a fortune on actual robot parts. I was browsing various robot kits when I came across a tutorial on Instructables for turning remote control cars into battle bots. The idea was to build a simple cardboard cover for the car then add weapons which would be used to pop a balloon on the opponent's car. Cardboard armor?! Ingenious! Popping balloons? Fantastic! And we even had a couple cars we could use so I didn't have to buy a single thing for this project. It couldn't be more perfect! 

This post contains affiliate links. As an Amazon Associate, I may earn a commission on qualifying purchases - at zero cost to you.


We've had our cars for a couple of years so I can't find the exact same cars for sale but these two are pretty close (and budget-friendly). 


This car is similar to ours with the large yellow wheels. It has a tri-channel transmitter so you could have up to 3 of these cars racing or battling at the same time.


These cars have the 5th wheel which is pretty fun for stunt driving. I'm pretty sure if we tried to pop a wheelie while battling the armor would all fall off though. You can only race/battle two of these cars at the same time though (pay attention to the details so you don't get two cars on the same frequency - it says blue and red are the same frequency and need to be paired with black. The other colors list specific MHz). 


Anyway, on to building the battle bots!

This body is for the 5 wheeled car. The middle is 4.5"x7.25" with a 2" border.


 This body is for the rock crawler truck. The middle is 4.5"x11.5" with a 2" border.


Cut out the rectangle then fold along the border lines and slit 4 corners. We're going to be making a box.


For the 5-wheeler, I marked about where the antenna and 5th wheel were then cut holes. There's no perfect method here, start small and keep cutting the hole bigger until everything fits through. I also cut where the back wheels are since they come up high.


For the rock crawler, I flipped the truck upside down and gently pressed it into the center of the armor box so I could see where the little pegs on top lined up. You can see below where the pegs pushed into the cardboard. Then I marked where the antenna was and made holes using a screwdriver.


Here's what the armor looked like once I folded the boxes and hot glued them. 


I wanted the armor to come down more in the front and back to make it easier to attach the balloon as well as defenses/weapons so I glued an extra flap on both sides.


Then I gave the cars to the kids and set them loose. I let them each have two wooden skewers plus toothpicks for weapons and then whatever else they wanted from our crafting/tinkering supplies.

Presenting, The Dino Destroyer! It has a mouth full of razor sharp teeth as well as a spiked club hand!


And in the other corner we have the Balloon Destroyer Crusher Busher! Its main feature is a spike-studded wrecking ball but don't forget about the spiky tail! (I had to keep reminding both of them that if they put anything spiky on the back it would probably pop their own balloon.)


For the battle, one balloon is attached to the back flap of each car. I simply cut a slit up the middle of the back flap to hold the balloon.


 This is what it looks like on the car.


So there you have it! DIY cardboard armor to turn remote control cars into fierce battle bots! If you make your own, tag me on Facebook, @Cardboard Mom. I'd love to see all the different designs!


0 comments:

  Today we're jetting across the Atlantic Ocean to another landlocked country divided in two by a long river - Paraguay! Paraguay sits r...

Read and Rise Global Explorers 2021 - Paraguay


Today we're jetting across the Atlantic Ocean to another landlocked country divided in two by a long river - Paraguay! Paraguay sits right in the middle of South America and is often referred to as the heart - or corazón - of South America. Because South America lies in the southern hemisphere, the seasons there are reversed from the northern hemisphere. That means it's winter in Paraguay now and Christmas is in the middle of summer! (Here's a good video explaining why we have seasons: Why Are There Seasons?

This post contains affiliate links. As an Amazon Associate, I may earn a commission on qualifying purchases - at zero cost to you.

0 comments: